|
In the last step of Assignment 7, you got a first
impression of ePNK applications by adapting a simulator for P/T-Systems to a very
simple simulator for YAWL nets (not taking OR- and XOR-joins and -splits into account).
In this assignment, you will start building a YAWL simulator application for
the ePNK from scratch, in order to learn more about the architecture of ePNK applications:
annotations, action handlers and presentation handlers,
and the way they interact with each other. This is crucial for your project since
your report must explain in detail, how this architecture works.
In this tutorial, you will learn how to
- use annotations of Petri nets and how to define new types of
annotations for your purpose,
- annotate a net in an application,
- define how annotations should be shown graphically on top of
the YAWL net in the graphical editor,
- react to user interactions (mouse clicks and double-clicks) on
specific annotations, and how to
- plug in an application to the ePNK.
- Create a new empty EMF project (see Assignment 1.2
for details) in your Eclipse workspace for the YAWL simulator application;
remember to give the project a reasonable name.
Add the following dependencies to your project (by opening the
plugin/manifest editor by double clicking on the MANIFEST.MF
and selecting the dependency tab, see Assignment 7.2):
-
org.eclipse.ui
-
org.eclipse.gef
-
org.eclipse.gmf.runtime.diagram.ui
-
org.pnml.tools.epnk
-
org.pnml.tools.epnk.applications
-
org.pnml.tools.epnk.annotations
- as well as the project with the EMF model for YAWL nets
(from Assignment 5).
- The information an application would like to show to the end user on top
of the graphical representation of the net is defined by so-called annotations.
The ePNK defines some standard annotations for general use; these annotations
can (and, in your case, need to be) extended by specific applications. Moreover,
the application can define by presentation handlers how to visualize this
information; and the application can define by action handlers what should
happen when the user interacts with the annotations (clicks or double-clicks
on the presentation of the annotation) .
For the YAWL simulator, you would need annotations for enabled transitions,
for arcs which the user can select from (for XOR-joins and XOR- and OR-splits)
and for markings (note that for OR-joins, the user does not need to
select arcs, becaise a token will be consumed from all in-coming arcs from
a place which has at least one token in it). In order for the controllers
(see below) to be able to control
that exactly one arc from the incoming arcs is selected for an XOR-join
transition or that exactly or at least one arc from the outgoing arcs is selected
for an XOR- or OR-split, it would be a good idea that the selected arc "knows"
the annotation of the source or target transition and that the transition
annotation "knows" which are the select annotations of its incoming and
outgoing arcs (see 6.).
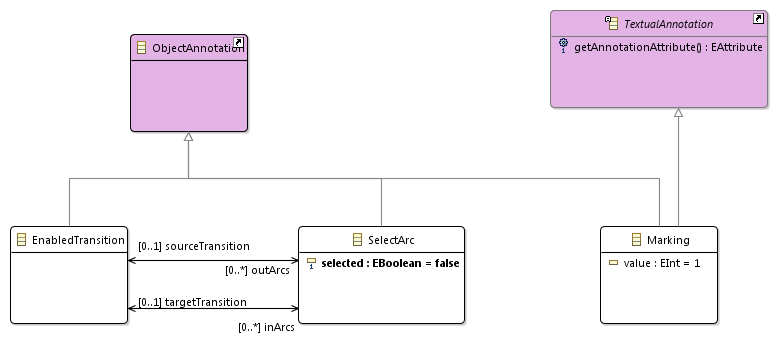
In order to make such classes ePNK annotations, they need to inherit from
classes from the package netannotations (http://netannotations/1.0)
from the ePNK. In order to make these classes available in the editor for EMF
models, you need to "load this resource"
to the editor
(as discussed in Assignment 5.3.b). An
ePNK ObjectAnnotation is an annotation of any Petri net Object;
a TextualAnnotation is an annotation, which in some way or the
other can be represented as text (like the marking of a place/condition in YAWL nets).
A minimal version of YAWL annotations for your simulator could look as follows:
In the new EMF project that you created in 1., create a new EMF model for
your YAWL annotations now; once the EMF model is complete (and validated)
generate the genmodel from it and generate the model code (you do not
need the edit, editor, and test code here). For details see
Assignment 5.3.
NB: Note that each annotation for ePNK objects needs to inherit from
the class ObjectAnnotation of the netannotations
package. And a class implementing TextualAnnotation must
have at least one attribute, which is typically shown as text label
close to the object. In the generated code for a class
implementing TextualAnnotation, the corresponding Java
class ...Impl
will have a method EAttribute getAnnotationAttribute() which is not
implemented yet. You need to implement the body of this method, which must return
the EAttribute that represents the attribute of the class. In the case of
the above example, this would look as follows:
return YawlannotationsPackage.eINSTANCE.getMarking_Value();
Once you made that manual change, don't forget to mark this method with
@generated NOT.
- Based on these new annotations, you can now implement the YAWL simulator
application. To this end, create a package in this project with an appropriate name,
and create a class which extends
ApplicationWithUIManager. Create
a constructor for this class with Petri net as its parameter; the
easiest way to do that is to automcatically generated it from the super class
(Source -> Generate from Superclass...).
One method that you must implement is initializeContents(), which
creates the initial annotations of the net on which the application is started. In
this method, this net is available by the method getPetrinet().
In order to add the object annotations to somewhere, create a new
net annotation first:
  NetAnnotation netannotation = NetannotationsFactory.eINSTANCE.createNetAnnotation();

          netannotation.setNet(getPetrinet());
Then create the corresponding annotations for each object that should
have an overlay in the initial situation; for each object annotation, you must set
the underlying Petri net object that it annotates; and for the
the new Annotaions defined in 2., you also need to set the other features
and references. Then,
add it to the netannotation
by calling netannotation.getObjectAnnotations().add().
In the end, add this annotation to the application and set it as the
applications current annotation:
  this.getNetAnnotations().getNetAnnotations().add(initialAnnotation);

	    this.getNetAnnotations().setCurrent(initialAnnotation);
Note: As discussed in the tutorial session of lecture 8, it is a good
idea to split up the computation of the annotations into a method
that computes
the initial marking from the YAWL net (which could be represented as a Map
from Place to Integer), and a method that computes a net
annotation from that marking (see the P/T-net simulator example in Assignment 7.4).
In a given marking, each place that has at least one token should receive a Marking annotation. Moreover, each enabled transition should receive a
EnabledTransition annotation. If this
transition is an XOR-join, all the incoming arcs from a place with at least
one token should receive a SelectArc annotation with the target
set to the EnabledTransition annotation; and exactly one
SelectArc should have the selected attribute set to true. Likewise, all outgoing arcs should be annotated with a SelectArc annotation, with the source set to the EnabledTransition annotation if the transition is a XOR-split or an OR-split. If it is a XOR-split the attribute select should be set to true for exactly
one of these SelectArc annotations; if it is an OR-split, all the attribute select should be set to true for all
of these SelectArc annotations.
Note: There is one additional method of applications, which you might want
to override: shutDown(). If you acquire resources while the application is running, you can
(and should) release them when the application is shut down. This can be implemented
in the method shutDown(). But you will probably not need that for now.
- In order to test your initial version of the YAWL simulator (basically its
initialization), you need to plug it in to the ePNK. To this end, you need to
implement a
factory class for your ePNK application which could look as shown in the
following example:
YAWLSimulatorFactory.java
In order to make this factory class know to the ePNK, you need to add a snippet
to the
plugin.xml that defines this extension.This should look like the one
shown here: plugin.xml
Now you can start the runtime workbench of your Eclipse; in that workbench,
create or open and existing PNML
document with a YAWL net in it and open the graphical editor on the page
of that net. Open the ePNK application view. Form there, you should be able
to start your YAWL application. It will not do much; but, once started, it
should show the initial marking as annotations of the corresponding places,
and the enabled transitions as annotated transitions (and possibly some arcs
annotated).
Note that you cannot interact with these annotations yet (or the graphical representations
of it) yet. This possibility will be implemented in the next steps. So shut down
the runtime workbench for now.
- In order to define the graphical appearance of your annotations, you need
to implement a
IPresentationHandler class
(similar to the one in the P/T-simulator from Assignment 7.4); this presentation handler should define for some of
your annotations (at least for
SelectArc) how they look; for SelectArc annotations,
you could create a PolylineOverlay for
the arc and set its colour to grey if the selected attribute is false (it will
be red by default).
The handle() method of an IPresentationHandler
will be called for each object annotation of the current net annotation together
with the underlying graphical presentation of the object. The graphical
representation is the so-called
AbstractGraphicalEditPart. The code>handle() method must to
return an IFigure (typically
an overlay that is attached to the underlying AbstractGraphicalEditPart)
for the annotations it takes care of (it can return null; in that
case other presentation handlers could take care of it, in particular the
default handler).
In the constructor of your YAWL simulator application, you need to create
a new instance of this handler by using its constructor and add it
to applications presentation manager, which could look as follows:
         ApplicationUIManager manager = this.getPresentationManager();

         manager.addPresentationHandler(new YAWLAnnotationsPresentationHandler());
- At last, you need to implement a class or several classes implementing
IActionHandler,
which define what to do when the user clicks or double clicks on an annotation. For
SelectArc annotations, it should select or unselect the underlying arc;
but you need to make sure that the selection of all arcs of a transition is
consistent (i.e. exactly one arc selected for XOR-joins or -split and at least
one arc selected for OR-splits).
In order to make sure that the presentation of the annotations is updated properly
after a change, you need to initiate an update on the respective application:
application.update();
(for details see the P/T-simulator in Assignment 7.4).
In the same or in an additional IActionHandler, you need to define
what happens when a user double clicks on an EnableTransition annotation.
In that case, the underlying transition should fire (for transitions with other splits
and joins than AND, the selected arcs of the transition should be taken into account).
To this end, you would first need to compute the marking from the current annotation,
then compute another marking after the transition has fired, and then compute
the new net annotations from that marking (see 3.). At last, the new annotation
should be added to the application, and set as the current one; in order
to get the back and forward buttons in the ePNK application view right, it
is a good idea to also delete all annotations after the current annotation. Assuming
that the new net annotation is computed already and assigned to
netAnnotation,
the code for deleting all net annotations after the current one and adding the
netAnnotation as the new current one, the code would look as follows:
  application.deleteNetAnnotationAfterCurrent();

            application.addNetAnnotationAsCurrent(netAnnotation);
At last, similar to the presentation handlers, you need to create new instances
of the action handlers, and register them with the application in the constructor
of the application. This could look as follows
         ApplicationUIManager manager = this.getPresentationManager();

         manager.addActionHandler(new EnabledTransitionHandler(this));

         manager.addActionHandler(new SelectArcHandler(this));
- Now, you can start the Eclipse runtime-workbench again for checking whether your
action handlers, your presentation handlers, and the methods for checking enabledness
and for firing a transition work properly on your YAWL nets.
It probably will need some rounds of tweaking and bug fixing, before everything
works fine.
NB: When you have successfully finished assignments 5–8, your will have a good
starting point for the final project of this course. Note, however, that some required
features are still missing (e.g. the visualization of tokens that might still arrive
at an OR-join, properly dealing with nets which are split up into several pages, or some missing constraints).
Have a careful look at the project slides again
in order not to miss anything. You will find some information on how to deal with nets
split up on several pages and how to "flatten" nets in the ePNK manual (pp. 81 and 91 on FlatAccess),
and you can also have a look into the simulator for P/T-Systems (Assignment 7). Feel free to ask, then information will be provided and discussed in the remaining tutorial and project slots — but it is up to you to ask!
|